Sunday, January 27, 2019

I Love Our History Timelines!


Ode to a Timeline

Oh I really love our timelines! I have been doing them for six years with my kids and this is something about our homeschool work that has really lasted and I still love doing with them. I may  be hugging a timeline right now. This idea of using a timeline comes from the Charlotte Mason philosophy of homeschooling, which she called a Book of Centuries.

What is so great about using a timeline for history?

The very most awesome thing about using a timeline is it frees you to study history out of order. Study history as your child's interest dictates! If they want to study the pyramids and then tanks from WWII--it doesn't matter! If you have a chance to check out a cool local history site even though you are studying the renaissance, go for it! It all just goes in the timeline and it is easy for children to see how it all relates to all the rest of history.
Another nice thing about timelines is you can go through them to review what you have studied. They don't have a chance to forget everything since it is all in a timeline that they use every week. It becomes a portfolio of their studies.

How I made our timelines:

I got my binders at Target. They are Up and Up brand 2" binders and they are PVC free, so no yucky chemicals for us. The covers and spine printouts I got from Guest Hollow. They are free printables and have a boy and girl version. They are pretty cute!


The timeline pages inside are from Build Your Library ($9.99). I got these because I liked the color on the pages and the way the years are set up (longer spans for the ancient times going down to 10-year increments for modern times. Each of the 4 main parts of history are a different color on the top of the page as well, so it makes it a bit easier to find out where you want to be in time. These correspond to many history series such as Curiosity Chronicles and Story of the World (the latter is not totally secular but I use it for some things).


This is how we do our timeline: 
Whatever history we learn about, whether in our history curriculum Curiosity Chronicles, on a field trip, in a YouTube video, in a historical book we read, or a documentary we watched on TV, we put it in the timeline. We do have some timeline stickers I ordered from History Odyssey and the printable timeline figures that come with the Curiosity Chronicles Activity Guide Bundle, but often we have to find our own, so we choose an image from Google Images and print it out, cut it out, and paste it into the book in the appropriate place (I buy lots and lots of glue sticks). Then I have the kids write the date and anything interesting we want to include.


Curiosity Chronicles comes with cute "baby was born" timeline figures, so we have put all the members of our family in, including grandparents and other relatives. This allows the kids to see, for example, that Grandma and her sister were born in the midst of WWII, and what else was going on in the world at that time.

When the kids are older I plan to do a family history project with the kids and we can add more ancestors to the timeline and see what was going on when they were alive. It makes history come alive when you know your ancestors lived through it.

The kids are able to make so many connections with this timeline! I plan to continue using the timelines through high school and they will be a great keepsake when my kids graduate from homeschool.

Saturday, January 19, 2019

Second Grade Curricula 2018

Second grade? They were just doing preschool work a moment ago!

Math
Math-U-See Beta

Language Arts
Reading Eggs Online Curriculum
Books for reading

Handwriting
Handwriting Without Tears (we are doing the first grade books again for more practice)

Science
The Happy Scientist Subscription
Mystery Science Subscription

History
Curiosity Chronicles: Snapshots of Ancient History

Baby Trend Expedition Review

A big slope down to the water, and a bit muddy along there, but it was no problem.
Sharing my love of nature with my kids is super important, but I have a toddler and a bad back that can't handle any kind of carrier for my 2-year old. So long hikes are not really possible right now. But my kiddos and I really need our vitamin N (nature)! So I wanted a stroller that could do some off-roading. My stroller could not do any off-roading. It was strictly for mall-walking.

I looked at some strollers rated for hiking. Some of them were $400 which does not fit in this single mom's budget. Yikes! Sticker shock. Then I stumbled upon the Baby Trend Expedition which had pretty good reviews on Amazon, but wasn't too expensive for me. It's about $100, but at Amazon I even found a pink and black one for just over $70. Now that I can afford. Sold!

The stroller has a pretty full canopy, cupholders and a little box with a lid for my keys. It has a basket below that could be bigger and sturdier, but it is sufficient. With the addition of some stroller hooks it will be just fine. On our zoo treks the stroller drives so smoothly and rolls with the slightest touch.

Probably the only thing I don't like about this stroller is the mechanism that allows the seat to recline. It is basically just a cord with a clamp on it. So it works for the two year old, but if one of my older boys wants a ride, his weight pushes the clamp back down and the kid ends up lying down. I worry that the clamp might loosen over time. I might try to McGuyver something to hold it if that happens, but it's sad they didn't do something more solid for this.

Now that the weather is good again I finally got to try it out for some off-roading. We headed out to the Hassayampa River Preserve. This place has a gravel parking lot, dirt paths with some areas of deep sand, a little mud, and some rocks, tree roots, and fallen branches.

The Expedition happily bounces over the lumps and bumps in the trail without slowing down. It hopped right over tree roots and small logs in the trail and it smoothly rolled my little sweetie up and down little hills without me working too hard.

My old stroller would have gotten stuck on this!

It was easy to get the stroller over this log.

My old stroller would have been lost forever in this sand.

The stroller did great on deep sand. It was slower and a more effort than on hard ground but it did it just fine.

Marvelous! We had a lovely day in nature and it's all because of this stroller. Yay! I can get back to adventuring with my kiddos!


Tuesday, January 8, 2019

My First Chinese Words Mandarin curriculum


I thought I would write an (initial) review of My First Chinese Words curriculum, thinking it might be helpful of others since I had such a hard time finding any sort of Mandarin curriculum for young kids, and so far this one is working for us.

I wanted my children to learn Mandarin because:
  • They are half Chinese!
  • My kids' Chinese grandparents, who are also here in the US, don't speak much English (although my mother-in-law has been learning lots of words, good for her) and I want the kids to be able to communicate with them. 
  • I want them to be proud of and understand their Chinese heritage. 
  • I want to give them a skill they can make use of in today's global economy.
So, since I am the teacher in our homeschool, I ended up being the teacher of Chinese culture and language for our children. Which I know nearly nothing about. Yikes.

So, I needed some kind of curriculum. My requirements were:
  • Did not require me or my children to know any Chinese. I would be learning along with the kids.
  • Was fun and colorful to engage small children.
  • Would progress in slow, baby steps.
  • Was a pretty good program in terms of quality (I knew I probably wouldn't find something amazing, since Chinese curricula aren't exactly super common in the US).
  • Not too expensive, since my plan was to have the in-laws pay for it (hey, I'm broke, and they want the grandkids to learn Chinese, right?).
So I found My First Chinese Words, by the company Better Chinese. It looked as if it would fit the bill, so I talked to the kids' grandparents, and they gave me $100 to buy it! This program teaches by helping the children read books in Chinese. You learn all the words to read the first book, then the second book adds more words, and so on. The books in the online program are animated and can read the book aloud to you if you wish.

I purchased:
6 months of the online program
The workbooks (there are two)
The flashcards (They are huge! Classroom sized.)
The game cards

We did not buy the books and CDs, since they are the same thing found in the online program, and the online program has additional exercises, videos, and activities.
My kids really liked the videos about the development of Chinese writing characters that they have in the online program. They have a funny animation for each character.

Not that many people have kids learning Mandarin, so I thought I'd post some fun and useful resources that I have found. These resources are mainly for young children just starting out in Mandarin (since that's what I've got). I will be adding more resources to this blog post as I come across them.

Here are some free resources we are using along with this curriculum:

Fun Fun Elmo Videos
From the makers of Sesame Street, "'Fun Fun Elmo' is an Educational Program designed to teach children the basics of the Mandarin language." Thirteen episodes are free on YouTube.

Mandarin Numbers Music Video
My kids LOVE this video. We all know our numbers in Mandarin now but we still have to watch this video at least once a week, and with at least 3 encores. My son knows the whole song by heart.

Basic Mandarin Phrases Video
By the same people as the music video above. Includes phrases such as hello, goodbye, I'm sorry, thank you, you're welcome. I love this one because they repeat and that helps to learn to say it with the correct tones.

Monkey Write App (Android)
We use this smartphone app just for practicing writing Chinese numbers because that's the part that's free. It teaches stroke order, scores your attempts, and is fun and easy to use. If you are working on learning Chinese numbers it's just the thing.

 Miss Panda's "Ni Hao" and "Numbers" Songs Video
 Beginner songs for the little ones. Miss Panda also has other videos, including the itsy bitsy spider in Chinese, and popular children's books read in Chinese.

www.poissonrouge.com/schoolofchinese
A basic Chinese vocabulary learning activity. The kids click on objects in rooms and it says and shows the word in Chinese.

UPDATE: I stopped using this program after a couple of years, simply because I didn't have time, and since then I have decided to focus more on Spanish, because I know so much more about Spanish and I can teach it a lot better.

I did like the program, and I think it is nice for young kids or even a little older ones who are new to the language. My kids enjoyed it. The workbooks don't have very many activities for practice, so supplementing with more activities would be a recommendation. We watched a lot of YouTube videos with songs and such. But the online component of this program was good and the flashcards and especially the game cards were helpful.

Saturday, September 8, 2018

6th Grade Curricula 2018

It's hard to believe my kiddo is ready for 6th grade. When did this happen!? Here's what we are using this year.

Math
Math-U-See Zeta

Language Arts
Time4Learning Online Curriculum
Word Roots app (Critical Thinking Company)

History
Curiosity Chronicles: Snapshots of Ancient History
"Book of Centuries" AKA our timeline binders (we got our timeline pages from Build Your Library)

Geography
US Map
YouTube travel videos about various states

Science
Time4Learning Online Curriculum
Mystery Science Subscription
The Happy Scientist Subscription

Saturday, September 9, 2017

First Grade Curricula 2017

First Grade for my 6 year old and highly motivated 4 year old consists of the 3 R's: reading, writing, and 'rithmetic:

Math
Math-U-See Alpha

Language Arts
Reading Eggs Online Curriculum
Bob Books
Usborne Very First Reading books

Handwriting
Handwriting Without Tears

Thursday, June 2, 2016

How I Organize Our Schoolwork With Minimal Planning

I liked the idea of the workbox program since the child can see for himself what needs to be done and just pick up his own materials and get to work. This fits in with my fave Montessori philosophy of fostering independence and responsibility.

I don't have much room for workboxes, and my old system of work folders was getting cumbersome with all the fat books and more subjects, and I actually had to remember to fill them, which was too much like work. So found a corner and I got these Sterilite drawers. I used a pair of old nightstands to hold them. I use them more for organizing the kids' school books than as workboxes. The drawers on the left are for my preschooler, and those on the right are for my third grader. Each drawer houses all the materials for a different subject. The children can easily find what they need. Current reading books are in the white drawers below, and cards and manipulatives are on top. In the slot to the right is a lap desk if they want to do work on the couch.


For my third grader we do school 6 days a week, but four of those days are half days. This is because I work 2 days a week, so on those days he does the work for that school day that he can do by himself. And the other 2 days we have homeschool park days, so we do a half-day afterward and do together the subjects that he needs help with. So we end up completing 4 full days of schoolwork each week.

Weekly Schedule Card

I create a weekly schedule card at the beginning of the semester and post it on the wall and generally it doesn't change. I figure out how often we need to do each subject per week to finish within this year. We school year-round so I have plenty of time. Some subjects we don't need to finish but it's more about how often is appropriate for good learning. So I figure that out roughly and make the weekly schedule on the card. This is the extent of my planning. I hate planning. I don't keep track of anything, either. That is because I live in Arizona and the law says I don't have to.  Which is awesome.

The kiddo mostly has the same subjects to complete for every full school day, but he has 4 subjects that happen once a week: history/geography, handwriting, science, and Wonder Time (that just means he picks something he wants to learn about). Those are the ones on the bottom of the schedule. Generally we just work straight thorough our textbooks for subjects like math, writing, handwriting, spelling, and science, so I don't need to really plan for those, other than making sure we have supplies on hand for science experiments. For other subjects we change activities and topics as we get bored. Here's an example:

"I think we're done learning about ninjas. What should we do for history now?"
"I wanna learn more about Martin Luther King Jr."
"Okay, cool. I'll go to the library webpage and order some the books on him. Then let's find some videos on YouTube."

The kiddo keeps track of what he needs to get done, all by himself. Here's how. Underneath the weekly schedule is a laminated card with 8 subject spots. I made a little laminated subject sticker for each subject and they stick on with velcro. It would be a lot cuter if I hadn't used ugly black velcro, but anyway, it works. 


I got the cards from this blog: theunlikelyhomeschool.com. But I needed some subjects she didn't have so I made a few of my own in the same style.  Here's all the ones were using these days:


Two strips of ugly black velcro above the card hold the extra stickers. The subject card used to be loose and we had it on the table as he worked, but I got tired of him losing it so I got a hammer and nailed it to the wall, ha! At the start of a school day, he checks what day it is on our big wall calendar, looks at the schedule, and puts the right subject stickers on the card. So we start with a full card and take them off, which is the opposite of workboxes where they take the sticker off each workbox and put them on the card.


If I remember, before I go to bed I put his next math page on a clip underneath so he knows which one to do. That is all the preparing I do.


He can do his subjects in any order he pleases. I do ask him to do certain subjects with me during my toddler's nap time. As he completes each subject, he takes the sticker off and puts it back on the velcro strip above. When all the stickers are removed, he's done for the day.

Yay! School's done!
The neat part is that some days, if he's really motivated, he gets up early and gets a big chunk of his schoolwork done while I'm still sleeping! Woohoo! I really love this system. It's easy to see what needs to be done and what's left to do. He's learning to get a move on and get his work done because he knows when he's done he's free to play video games or watch tv. And he doesn't get mad at me, since I'm not standing there telling him what to do all the time. Instead it's all up there on the card and he's responsible for it. This has really turned a homeschooling headache into a no-brainer (for the most part!). So how do you plan and organize your schoolwork?

Saturday, April 2, 2016

Secular Preschool Curricula 2016

Language Arts:
  • All about Reading Pre-Reading
  • Lots of library books
  • Reading Rainbow (iPad app)
  • Leapfrog Letter Factory and Phonics Farm (videos)
  • Using occasionally:
    • Montessorium Intro to Letters (iPad app)
    • Reading Raven (iPad app)
    • Montessori Crosswords (iPad app)
Math:
  • Mathematical Reasoning Beginning 1&2
  • Manipulatives: Math-U-See blocks, duplos with numbers on them, number line
  • Addition the Fun Way (addition stories)
  • Using occasionally:
    • Leapfrog Math Adventure to the Moon (video)
    • Montessorium Intro to Math (iPad app)

Thursday, November 5, 2015

Secular 3rd Grade Curricula 2015

Language Arts
  • Handwriting Practice: Jokes and Riddles
  • Handwriting Without Tears Jump Start Cursive
  • All About Spelling Levels 2 & 3 
  • Write Shop Primary Level C
  • Language Smarts Level D
  • Library books for reading together and independently
  • Using occasionally:
    • Just Write
    • Writing Detective 1
Math
  • Math-U-See Gamma 
  • Life of Fred books (Goldfish and Honey)
  • X-tra Math (free website)
  • Timez Attack (free computer game)
Keyboarding
  • Keyboarding Without Tears
  • Dance Mat Typing (free website)
Science
  • REAL Science Odyssey: Physics 
History
  • Our own unit studies! We mostly just read library books and watch documentaries, and check out websites. Topics this year: knights and castles, ninjas and samurai, Chinese kings and warriors, African-American history, and the history of inventions.


Saturday, September 6, 2014

New Uses for Winter Gear, When You Live in Phoenix

In the summertime, when it's about 115 degrees outside, we usually start talking about moving somewhere cooler. Somewhere where you actually need a scarf and gloves in the winter, or where it rains enough that you actually own an umbrella. This year we decided to try to think of things we could actually do with all that winter gear if we had it here in Phoenix. After much silliness, here our our recommendations:

Umbrella
A device that provides portable shade. Stay out of the blazing sun! Useful anytime you are out-of-doors.

Gloves
You could keep a pair in the car to use to keep the steering wheel from burning your hands. You might also want to keep a pair of oven mitts in your vehicle, for days when the gloves don't provide quite enough protection.

Thick socks
Thick winter socks would be perfect or sliding over one's (frozen, of course) water bottle to provide insulation and help it stay cool longer, and it would absorb any condensation!

Scarf
This one could have lots of uses. When soaked in water, it could keep your neck cool and provide protection from sunburn. It is also handy to wrap around your face and mouth if you get caught in a sudden dust storm.

Coat
Another item best kept in one's vehicle. Would be perfect for wrapping frozen foods and ice cream in to keep them from melting on the way home from the grocery store.

Boots
Desert dwellers usually wear sandals, but those winter boots would be just the thing when walking near natural desert areas full of rattlesnakes, gila monsters, scorpions, and giant centipedes--you know, to prevent a nasty bite.

There you have it, lol! If you can think of a desert use for a winter hat, let me know. We got stuck on that one.


Monday, August 25, 2014

Secular 2nd Grade Curricula 2014

 After a very difficult year with a new baby and working way too much and being horribly behind in our homeschool lessons, I think I am finally starting to see the light of day. At least by working so much I had the money to purchase all the new homeschool curricula I wanted. Our school year starts the first week of September, and this is what we'll be doing this year:

Handwriting/Keyboarding
Handwriting Without Tears: Printing Power
Keyboarding Without Tears 2nd Grade
Math-U-See Beta
Life of Fred Books

Reading
Library books
Reading Rainbow App

Spelling
All About Spelling 1 & 2

Writing
Just Write by Tin Man Press

Language Arts
Flash Forward Language Arts Workbooks

Literature/History
Build Your Library Curriculum 2nd Grade, which uses Story of the World Middle Ages and The Usborne Encyclopedia of World History as spines

Science
REAL Science Odyssey Chemistry

And with all the time we will have left over after doing all that:

Languages
Better Chinese
Rosetta Stone Mandarin Chinese

Salsa Spanish videos

Saturday, July 19, 2014

Chinese Hawthorn Candy (Haw Flakes)


My kids' Chinese grandparents always give this candy to my kids. Haw flakes are a Chinese candy made from the berry of the Hawthorn bush. It is supposed to be nutritious and especially good for the digestion. The flakes come in a jar full of little wrapped rolls like rolls of coins. Each roll contains a stack of flakes. The flakes are thin, somewhat dry, and have a grainy texture with a sweet and sour taste.

Left: Haw flakes. Right: Haw cheese.


A new one my in-laws found is "haw cheese." How do the Chinese come up with these translations? It is a hawthorn candy which has a moister, chewy, "fruit roll-up" texture in a little striped block. I like the lady on the package. Thanks to her haw cheese she's energized and ready to kick butt.

My kids adore these hawthorn sweets. You can find them at most any Asian market.

Hawthorn berry

Sunday, December 22, 2013

Our Christmas Eve Box!


I've seen this on Pinterest and I love this idea. I really wanted a special Christmas eve tradition for my kids. So I am making them a Christmas eve box! It's a big box with a tag that says "do not open until Christmas eve." It's got comfy new pajamas for the kids and fun things to do that night. And on Christmas morning they'll look adorable in their new jammies for photos. Here's what I've included in the box:

There's a train! He's going to love them!

For oldest boy: He loves his robe but he was outgrowing it, so I found new one at Target. Then I ordered new Hanna Andersson pajamas with train decal (he loves trains). Hanna Andersson pajamas are expensive but they had a sale and I know they will last and last and can be handed down to his brothers.

Adorable reindeer pajamas!

Middle boy: He gets his brother's old robe which is still in great shape, and these new Hanna Andersson jammies with reindeer that I found on ebay. They are so cute and Scandinavian-looking (I'm half Swedish so I love that!)

Baby boy: I found some cute striped Carter's jammies for him at Target. I love Carter's for babies. I forgot to take a pic of those but you get the idea.
Goodies

All the boys: For story time I got a beautifully illustrated hardcover copy of The Night Before Christmas. I fell in love with this version when I saw it at Toys R Us but I got it a lot cheaper on Amazon. For making and decorating sugar cookies, I got Christmas cookie cutters and a pack of assorted decorations for cookies: red and green sugar, sprinkles, etc. For the movie I found this Original Christmas classics collection DVD at Costco for $17 something which was the best price anywhere. It has the old Rudolph, Santa, and Frosty the Snowman movies I remember from when I was little, plus a few more. Then I got cute pouches of cocoa with Santa on them. I found those at Cracker Barrel. I could have also put in mini marshmallows and popcorn but I already opened the packages so I'll just bring them out when we're ready to party.

So, on Christmas Eve we'll be watching Christmas movies, drinking cocoa, making cookies, and reading The Night Before Christmas! The kids are going to love it! What goodies would you include in a Christmas eve box?

Sunday, November 3, 2013

Autumn in the Arizona Desert


In most places in the United States, folks are wearing coats and watching the leaves turn colors. But we live in Phoenix, Arizona, which is in the Sonoran desert; we have an entirely different climate. Our leaves are still green and still firmly attached to the trees--they don't fall until late November or December. And we are still wearing our shorts. Instead, Autumn for us simply means that the summer's scorching heat finally breaks. This happens in October. Instead of 110+ degrees, we get to enjoy temperatures in the 80s and 90s. Cool breezes begin to blow across the desert. It's something of a celebratory time. Folks emerge from their air-conditioned homes, where they've largely been trapped for the past 5-6 months. Suddenly children are playing in the streets, riding bikes and scooters, playing ball and flying kites. Parks are busy again. Windows are open to admit the fresh air, and people sit outside on their porches and patios in the crisp evenings.

Now that the searing heat has passed, it's also time for the fall growing season. The garden centers and nurseries are busy places. We plant our veggies and herbs in September and October, and it's time to sow the rich green winter rye grass. And backyard barbecues are a delicious change.

Nature study time

For us homeschoolers, it's field trip time. The zoos, botanical garden, hiking trails, historical sites, farms, and pioneer town are places we can actually visit now. Outdoor nature study is possible again. I like to take my kids to some of the nature parks around town. It's a great (and free) place to get up close and personal with the desert wildlife. We have seen quail, roadrunners, jackrabbits, huge black millipedes, lots of lizards, and even a baby rattlesnake. The famous saguaro cacti are interesting to examine, with their accordion sides that expand and contract depending on how much water they are storing. Other desert trees and plants have their own ways of surviving through the dry periods, and we can look and learn about them. Birds are migrating to our southern clime during this time as well, and we can see species that we never normally see. There are lots of pretty hummingbirds about, too.

Halloween is an exciting holiday for the kids. After many months indoors, it's fun to dress up in costume and enjoy the cool evening, going from house to house and getting candy. Another tradition you will see around here is celebrations for Dia de los Muertos (day of the dead).


Since Arizona borders Mexico, and a lot of people here are from Mexico, we have adopted this interesting and colorful Mexican holiday. It is a celebration in memory of loved ones who have passed on. People set up lovely decorated altars with photos of deceased family members, candles, gifts of food and drink, and beautiful skull and skeleton figures. At Dia de los Muertos celebrations around town you can find skull jewelry and skeleton decorations to purchase. Our church celebrates this holiday with several altars set up in the sanctuary. People bring their photos, and the sermon is devoted to the memory of those who have passed. It is a healing moment for those who grieve for someone.

Coloring calavera (skull) masks


Mexican families visit the cemetery during this time. I like to go there too, together with my children. It is a good time to remember those in our family who are no longer with us, and to recognize that death is part of life. Sometimes I see Mexican families at the cemetery who bring flowers and gifts for their loved one, and light candles. Sometimes they even bring folding chairs and a picnic, and sit near their loved one, telling stories, playing guitar and singing songs.

When we go to the cemeteries we visit the graves of my maternal grandparents and a great-grandfather I discovered while researching my father's family history. I want my children to know their names, and when they lived, and know some stories about them. I think family history is an important part of homeschool history. My 6-year-old likes to investigate the oldest part of the cemetery, with headstones and mausoleums going back 100 years or more. A lot of Arizona history is resting there. I tell him how they lived here back then, sleeping out on the porch or roof during summer nights, wrapped in wet sheets because they had no air conditioning. We cannot imagine it!

I would say for those of us living in the desert, Autumn is our happiest time. Even though we don't have beautiful fall colors to enjoy, we have the most wonderful weather. It's a lot like Spring for those who live in snowy climes. After many months of remaining indoors, we can finally go outside and experience the wonders of our desert home.

So have you ever been to the Sonoran desert? What's autumn like where you live?

Thursday, October 24, 2013

10 Rules I Never Thought of Before I Had Kids

A lot of times when my kids do naughty things it's just because they really don't know any better. They're pretty young after all. I often find myself explaining that what they are doing is not okay, and I have had to come up with some pretty crazy new rules. Here's a sampling:

1. We do not chew on our toenails.
2. We do not eat diaper cream.
3. We do not eat old jelly beans out of the trash.
4. We do not recycle our good kitchen utensils and removable hard drives.
5. We do not throw rocks, garbage, toys, binkies, etc. in the swimming pool.
6. We do not take the goldfish out of their tank to play with them.
7. We do not take off our pants and pee in the front yard.
8. We do not jump on Grandma's expensive electric adjustable bed (oh no, too late!).
9. Especially when Grandma is holding a cup of hot tea, we don't whack her with stuffed animals (poor Grandma).
10. We do not call our preschool teacher a bad word!

What are some crazy-sounding house rules have you had to come up with for your kids?

Wednesday, September 25, 2013

Moon Cakes!

Last Thursday was Chinese Moon Festival. My kids are half Chinese so I decided we needed some moon cakes! I did some googling and found out Moon Festival, also known as Mid-Autumn Festival, celebrates the harvest and family, and the harvest moon...cool! People return to their villages or their hometowns and spend the day with their families, and they have a feast. It sounds kind of like Chinese Thanksgiving. And they eat mooncakes! They are pretty little pastries with lotus seed paste inside. No idea what lotus seed paste was like, but they sounded yummy. I'd never even seen a mooncake before. They are expensive, I discovered. We were shopping and I saw they had some for sale at the local Asian market. For around $30 for a box. Of four. Wow.

Moon cakes


Aren't they beautiful? Wow, so pretty. No wonder they are so expensive. Inside each one is lotus seed paste filling, and in the center is a salted egg yolk, which looks like the moon when you cut the mooncake. You are supposed to eat the mooncake by cutting it into four pieces and sharing, because it is so rich.

Lotus seed paste filling and an egg yolk in the center

The lotus seed paste tastes like sweetened peanut butter! Yummy. And the egg yolk is salty. The mooncake reminds me of a peanut butter cup, without the chocolate. It's very sweet and salty and rich. My oldest child hated the mooncake (but he is super picky and hates most foods) and my 2-year-old liked the lotus seed part but spit out the egg yolk. But I liked it!

My son and I also made some Chinese lanterns out of construction paper. It's an easy craft. Here's the instructions we used:

Chinese Lantern Tutorial

After we made and decorated our lanterns, I hung them over our dining table (taped them to the light fixture), and we went out to look at the moon, which on Moon Festival night is full, and it's supposed to be the brightest moon of the year. It was very bright, and we could see easily in the moonlight. Happy Moon Festival!

Sunday, July 14, 2013

Making Chinese Peanuts


This is one of my favorite recipes that my kids' Chinese grandparents make. Every time I go to their house I find these in the fridge and I have to attack them with chopsticks. It's a great snack and they are so fun to eat with chopsticks. They are salty, flavorful and crunchy, but not in the way that we're used to in America, where we eat our peanuts dry-roasted. They are moist, and perhaps more like a vegetable than a nut. Think edamame (soybeans), if you've ever had those. To get the ingredients you will need to go to an Asian supermarket. You can find the peanuts there; they are shelled and raw (not roasted or salted). These are 12 oz bags and I used one for this recipe.


You'll need a 12 oz package of raw shelled peanuts.

Then you'll need some wonderful exotic spices. 

Talk about fragrant! Red peppercorns, cinnamon sticks, and star anise.

The star anise is so pretty! 

Star anise.

Then there's  fresh ginger. You only need a tiny bit of ginger, so buy a small knob of it, and maybe have another recipe ready to use it in so it isn't wasted.

Fresh ginger.


Put the peanuts in a saucepan and add enough water to cover them. Then add two slices of ginger and 2 anise stars. For the red peppercorns, I use a half-teaspoon size measuring spoon as a scooper and scoop out a rounded spoonful of peppercorns and throw them in the pot. Then you'll need a tiny piece of cinnamon bark. These are the size pieces I'm talking about:

Tiny bits of cinnamon bark.

One or two of these is enough. A little goes a long way. Now everything's in the pot. Bring it to a boil. I put the lid on but leave a gap to let steam out, and cook it for 20 minutes on medium-high.


After 20 minutes, turn off the stove and add a tablespoon of salt (or more or less, depending how salty you like things) and let the peanuts soak for at least a half-hour. When they are done soaking, we eat them warm immediately, and the leftover peanuts we eat cold from the fridge. Scoop them out of their broth and into a bowl, and be careful not to eat the anise, peppercorn, ginger, or cinnamon bits (warn the kids). These peanuts are best eaten with chopsticks, which just makes it more fun! Yummy!


Get the most out of the public library


I occasionally add affiliate links to my posts--this means that if you click on a link to a product I have shared with you and purchase it, I get a bit of compensation. I only recommend products that I own or would actually buy myself. And every cent I get goes toward more homeschool stuff for my children's education, so thanks for your support. You can read my full disclosure policy here.

I really make good use of the library as a resource for our homeschool. I looooooooooove the library! We get so much out of this resource for our homeschool and it saves us lots of money. However, I had to come up with something of a system to use it effectively and not get fines! I thought I'd share the ways I get the most out of our public libraries:

Avoiding fines
I figured out pretty quick that in order for my library use to help my budget instead of hurting it, I was going to have to get really organized about returning things on time. Plus my husband was getting really mad at me about all the fines. Ooops! Sorry, Babe.

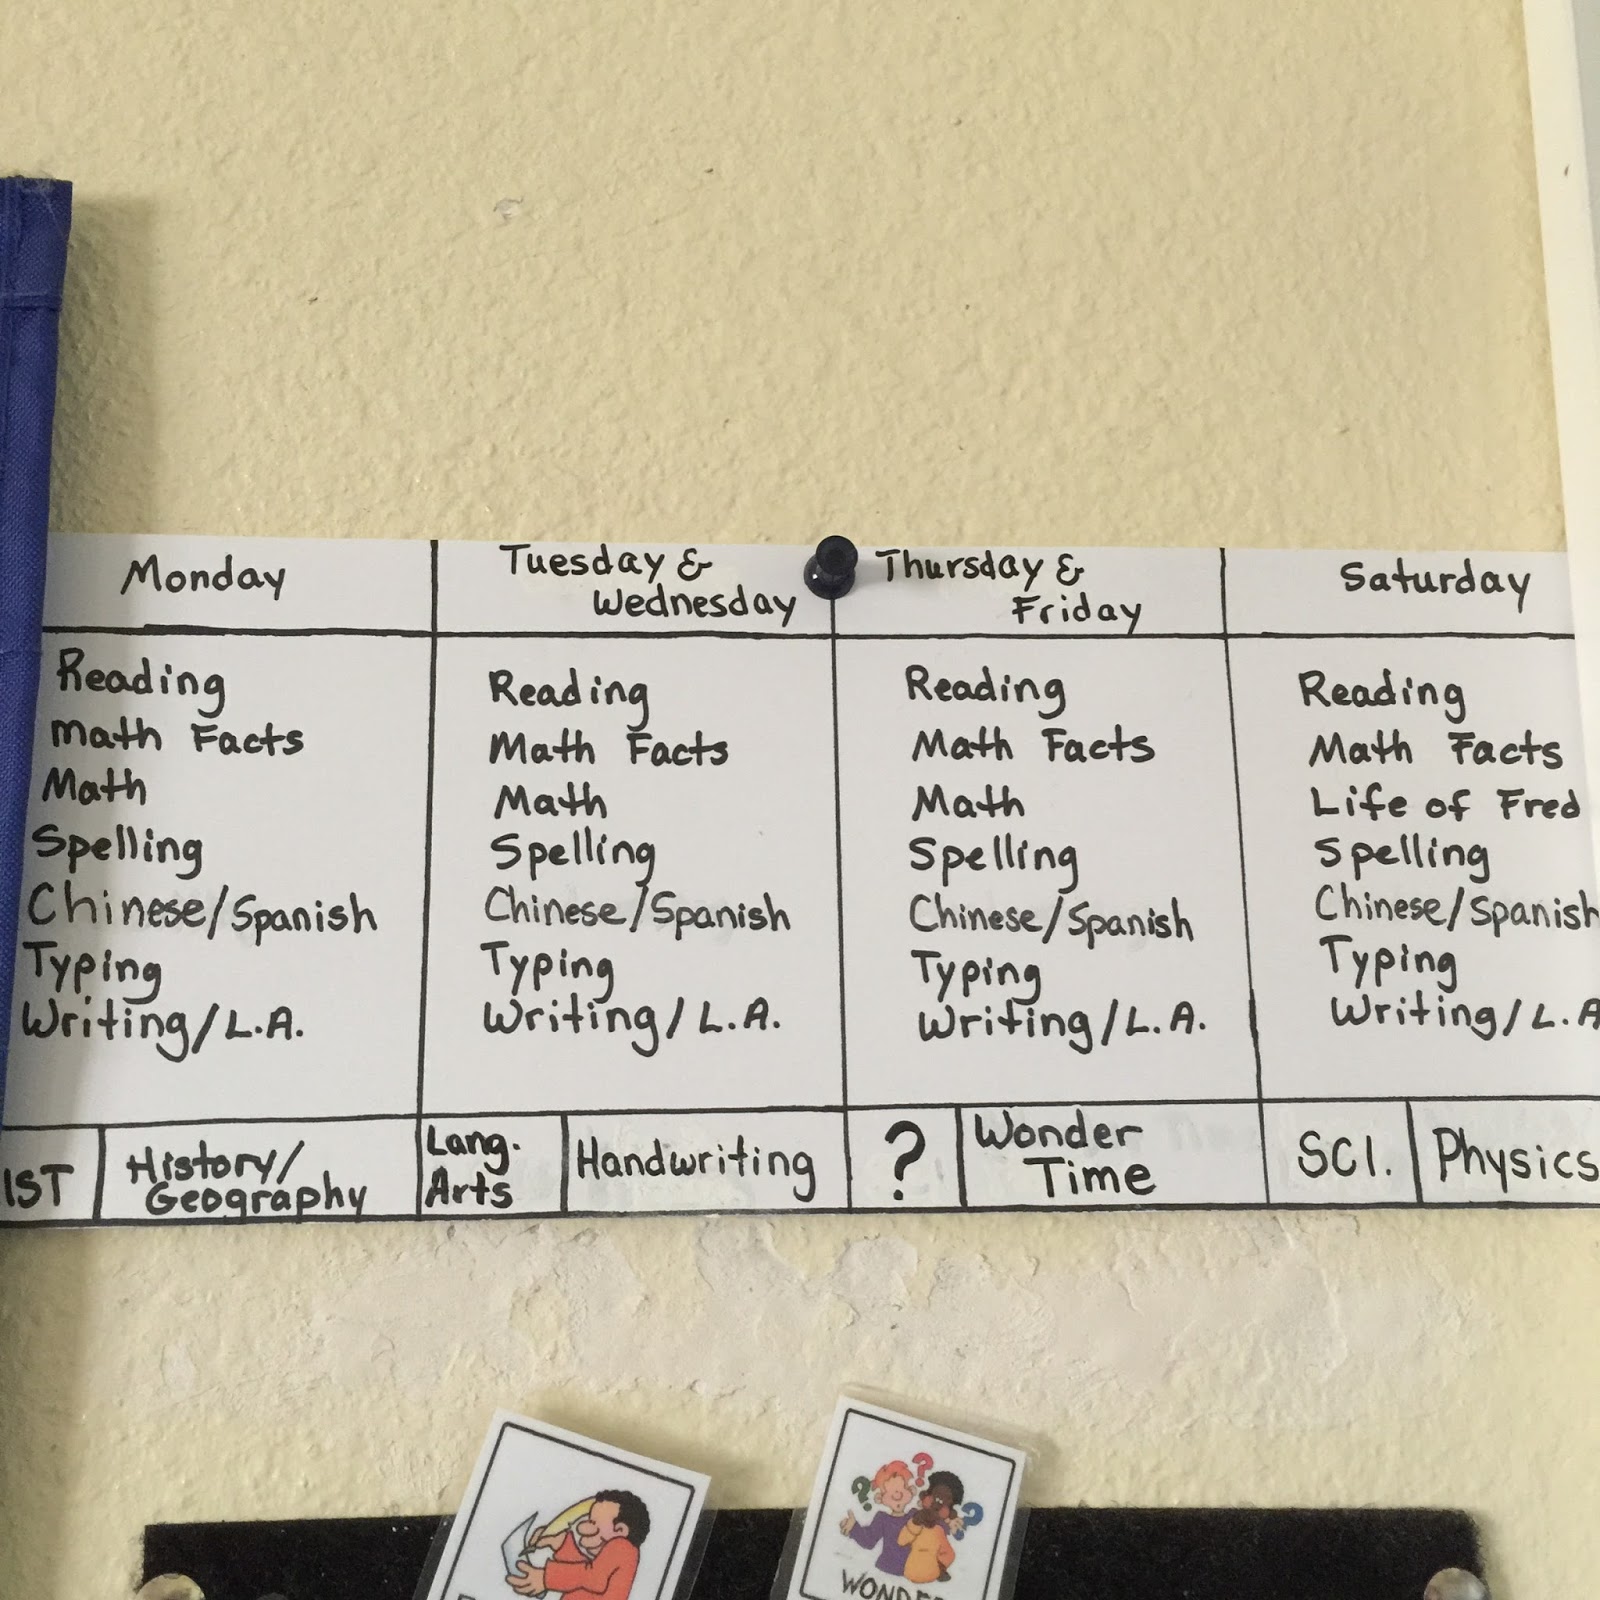
First of all I started going to the library on the same day every week. I put in the homeschool schedule. Wednesday is library day. Sometimes we skip a week or go to a different city's library, but we always go on Wednesday. So the books are always due on a Wednesday! That really helps with my constant absent-mindedness. And if I need to renew books, I always do that on Wednesday, too. So this helps me remember to address my library business on that day every week.

The other thing I started doing was posting our library due dates in a conspicuous place in the homeschool area. I just write it on a little note-paper and clip it to a pushpin on the wall. It's right next to our calendar, which we do daily, so I see it every day, and I can check at a glance when things are due. This has helped me so much and I always get the books renewed and returned on time now.


Since I often have books from different library systems I put the city name on there. I am hoping you don't notice that July 26th is a Friday. I forgot to get a book I needed for homeschool so I stopped by and got it on a Friday. But normally the due dates are always Wednesday. Do you like my dry-erase accessories holder? I made it out of laminated paper with a cute sticker on it! I'm so proud.

Not losing library books
Our library books used to be all over the house, and we kept losing them under the couch or under the bed, or they'd be in the playroom being used to build things. I kept having to renew them instead of returning them because I couldn't find them! So I got this cute basket and placed it in the homeschool area. Our library books now have a home. The kids can flip through them easily and I can watch over them better. I still have to remind the kids to put them back, but we're working on it. We haven't lost a single book since using the basket.


Knowing my library policies
Another thing I did was go to my library's website and research the rules and policies. I made sure I knew how long different library items, such as books, DVDs, and CDs can be checked out for. I honestly had no clue before. I found out how many times I can renew items (6! That's a lot!). Also I found out that I can join any city library system in my county for free! I am now a member of 3 different library systems; in addition to my city's library, I got cards for two adjoining cities. This allows me a better opportunity to find the books I need. Be sure to check out the library regulations in your area, and see if there's a similar arrangement! It's really helpful to have so much selection. Sometimes you are allowed to join another library for a fee. If it's not too much, consider doing it if the library has a nice variety of books.

Got the books we need for our curriculum
The curriculum I use for literature and history is Build Your Library. It's appropriately named, since it's literature-based and requires a lot of books. Most people who use these kind of curricula, I think, just buy all the required books to save time and bother. But since our homeschool is budget-impaired I can't afford to buy all the books required. :( Occasionally I'll come across the relevant books at the thrift store (for $.40 or $.50) or at the Scholastic warehouse sales (for $1.50) and I'll grab them (score!) but I can't count on it. However, since I am now very organized about these things (not that I am organized about anything else) I get nearly all the books from the library and save the money for other things.

This is how I do it. When I got the new curriculum for this year, I looked up each book we would need, and searched for it in my city's online library catalog. If it wasn't there, I searched the other two library systems. I marked down which libraries had each book. Any books I couldn't find, I went ahead and bought on Amazon. This year I bought the two spines that I would need for the entire year, and I ended up having to buy only two other books that weren't at the libraries. This saved me about $240! Well worth the extra work.

I usually make up my homeschool lesson plans about a month ahead, so when I do that I just write down each book on the week we'll need it. Each Friday I do a little check of what's coming up in the homeschool, so at that time I go online and place holds on the books I need for the upcoming week or two. By Wednesday, there they are, set aside and waiting for me at the closest library branch. It's all quite easy and convenient, since I planned ahead. And it's great that I can renew, search, and place holds all online.

As another option for the books I can't get at my local libraries, I could use Interlibrary Loan (ILL) to get them through a distant library. You can get books sent from any library anywhere (it's amazing). However, at my library it takes 7-8 weeks or more to get the book, renewals are iffy, and it's just hard to plan that far ahead, so I haven't resorted to it so far. But now I know I have the option.

Summer Reading Program
The library has other features we make use of. One is the summer reading program. Most libraries have them. My kid really enjoys getting the prizes. Honestly we read every single day anyway so it's not much of an incentive for him, but it makes going to the library fun when he gets a prize. This year I was really stoked because the prize for finishing the summer reading was a free book of our choice! I love getting free books for the kids since I don't get to blow all my money at Barnes and Noble like I want to. This is the book we got: 


Cute and very educational. I love the Let's-Read-and-Find-Out Science series.

Other fun stuff at our library
Most libraries offer classes, programs, and fun activities. A couple of the ones we make use of at our library is the LEGO club and the Culture Pass. The LEGO club is once a month. The kiddos love going to that. They just have tables with big piles of LEGOs and they get to build stuff. Then their creations are displayed in a glass case in the library until the next month. It's fun. I want my kiddos to love the library like I did when I was young, so anything that makes it an attractive place to go is a winner with me. The Culture Pass is something we use all the time for homeschool field trips. It's an awesome program for getting free admission to select local museums, the botanical garden, and the zoo. Yeah, sometimes you have to fight to get the coolest ones, but it's so, well, free!

So be sure to get the most out of your library for your homeschool! What do you use the library for?

Saturday, April 20, 2013

Organizing Our Daily Work: One Workbin instead of a stack of Workboxes

I would like to take a minute to show you how I organize my kid's daily work. I've come up with a simple system that's working like a charm, and taking up very little space!

My kiddo has between 8 and 9 subjects to complete each day (I know that sounds like a lot, but each one only takes 10-15 minutes to complete). But I needed to get all those subjects organized and prepared, and I wanted the kiddo to be somewhat responsible for doing his own work. I know he's only 5; I still have to sit with him at the table and do practically everything with him, but I'm sure he'll get more independent as he grows and I want to encourage that. I looked around on the internet and many people are using some variation of Sue Patrick's workbox system. I love the idea of it, and how it organizes everything, but it takes up a lot of space for all those boxes! My homeschool storage space is a china cabinet in one (small) corner of our (small) combined living room/dining room. It's my only spot for homeschool stuff, so there was no way to fit a stack of workboxes in. I also have two more children who would need their own workboxes eventually, so whatever I came up with had to fit in a small space!


So this is what I came up with: "work folders" stacked into a "work bin." We have one bin for "to do" (on the left) and another for "done" (on the right). I got these cute bins at Staples ($9.99 ea) and they're just the right size. The folders in the "to do" bin are stacked one on top of the other in order from first subject to last. Each folder is labeled and has an image representing the subject, since he can't read all the subject names yet. I printed out some cute clip art for labels and taped it to the folder with packing tape, covering it so it can't fall off or get dirty. I put workbooks, worksheets, and flash cards--whatever we need for our lesson--in the folders. Books and binders don't fit in the folders, so if there's one to use with the lesson I just place it under the folder. The labeled folders then function as dividers. Any books, binders, craft supplies, etc that are under the folder but on top of the next are used with the top folder's lesson.  I also threw together some bookmarks so I can mark where in the book he needs to start. Then he puts it back in where he leaves off so it's ready to go for the next day.

We go through the folders in order, and the order is the same every day. I think that helps with building habits, and knowing what is coming next helps eliminate some griping.  He is required to go get the folder on top of the stack (and any accompanying books) and bring it to the table to work with me. When we're finished he goes and puts everything away in the done bin. This lets him see how much more he has to do, and gives him a sense of accomplishment as he puts each folder into the done bin. He knows he's done when the last folder is complete. The folders also help with some of the complaining because it is not so much me telling him what to do. Instead he sees it as "that's what's in the folder, so that's what I have to do." He actually loves most of his lessons, but handwriting elicits groans!

Eventually I will replace all the paper folders with these heavyweight poly folders. They're tough and should last a long time no matter what I stuff into the pockets.

Handwriting Without Tears workbook, and some lined paper to write his name.

We sometimes do an internet-based lesson, so in order to put those lessons in the folders, I printed out each online curriculum's logo, laminated it, and I attach it to the folder with a clip or just stick it in the pocket. When the kiddo sees the logo, he knows it's time to go to the laptop. I did the same thing with an ebook we use; I just printed and laminated an image of the cover.

I load the folders after school is done, or before bed. It doesn't take much time, because I've already filled out a weekly planner sheet with the chapters and activities we need to do. And most of the subjects are the same every day, so I don't even have to reload those folders. It's a simple system, but it is working very well. The kiddo knows what he needs to do, and he knows what's coming next. And if I want to I can put a fun activity as a surprise in one of the folders. So that's what we're doing; I hope you find it helpful!

Monday, April 1, 2013

Our Huge New Family Bed


Today our new bed was delivered! It is a California king, and now we have two California Kings in one bedroom (luckily we have a large bedroom!). Since birth our first child has flat-out refused to sleep in his own bed (even within the same room), so we have always had a family bed. Now with two children in the bed and another on the way we were out of room. We decided to go all out and get another Cali king since we had the space. We asked the mattress delivery guy to tie the legs of the two frames together for us, and now we have the hugest bed ever! It is 7 feet long and a full 12 feet wide. Right now we will have 4 people sleeping in the bed, but when the new baby arrives in August it will be 5.


 We put the bed with one side against the wall. This is where I'll sleep, with the new baby between me and the wall, so he can't fall off the bed or get squished by one of his brothers.

We put separate bottom sheets on each mattress. There is a crack between them, but they're pushed pretty tightly together, so it's not going to be an issue. I even laid down right on the crack and it was soft and not bothersome at all (yay for pillow-tops). Anyway, can you see me sewing and washing 12 foot wide sheets? I don't think so. Nobody will have to sleep on the crack, but if they roll over there they'll still be comfortable. We have an assortment of blankets and/or top sheets so that everyone can have their own. In the morning we'll just fold all these up and place them at the foot of the bed.


One nice thing is I am able to get three long underbed storage bins under the end of the bed (you can just see one under the right side in the pic above), and one on the side, so that's where I'm putting stuff like wrapping paper, baby things, and the craft supplies I don't want to share with the kids. Yay for storage, especially since the bed takes up so much space. And yes, we actually still have room for other things in the room besides the bed (told you we have a big room). We also have two dressers, a big tv, two desks, a changing table, a treadmill, and a bookcase in there.

So that's our super family bed! It will be great to sleep comfortably and to see the kids so blissfully sleeping snuggled close to us. I love that I can easily keep an eye on them on nights when when they are sick. And when I wake up in the middle of the night I can easily check and make sure they haven't kicked off their blankets and are cold. And as far as the kids are concerned, it's a great place to play. So far they're enjoying bouncing, having pillow fights, and turning somersaults on it. So what do you think? Would you ever try a bed like this?